Scan-to-BIM Workflow: How Drones and Handheld Scanners Deliver Accurate As-Built Models
03 Oct 2025 | Brian Babu
If you’ve ever been involved in a renovation or extension project, you know the first hurdle is often the same: there are no drawings of the existing building. It doesn’t matter whether you’re dealing with an old colonial house, a cottage built in the 90s, or a school block added onto in bits and pieces over the years, the story repeats itself. Architects and engineers are asked to design in the dark, with only tape measurements, rough sketches, or outdated plans to guide them.
This was exactly the case in Karen, where we were tasked with documenting a private residential property. The compound had a cottage built in the late 90s along with a servant’s quarters. Neither had any existing records. There were no floor plans, no elevations, not even rough sketches. Yet, the client needed accurate as-built drawings and a digital model that could be used for future upgrades.
In the past, this kind of job would have meant days of manual measurement. Architects would walk through with clipboards and tape measures, drawing what they could, estimating the rest, and hoping nothing important was missed. Anyone who’s done this knows the frustrations: ceiling heights you can’t quite capture, staircases that don’t line up, or dimensions that mysteriously shift between site and drawing.
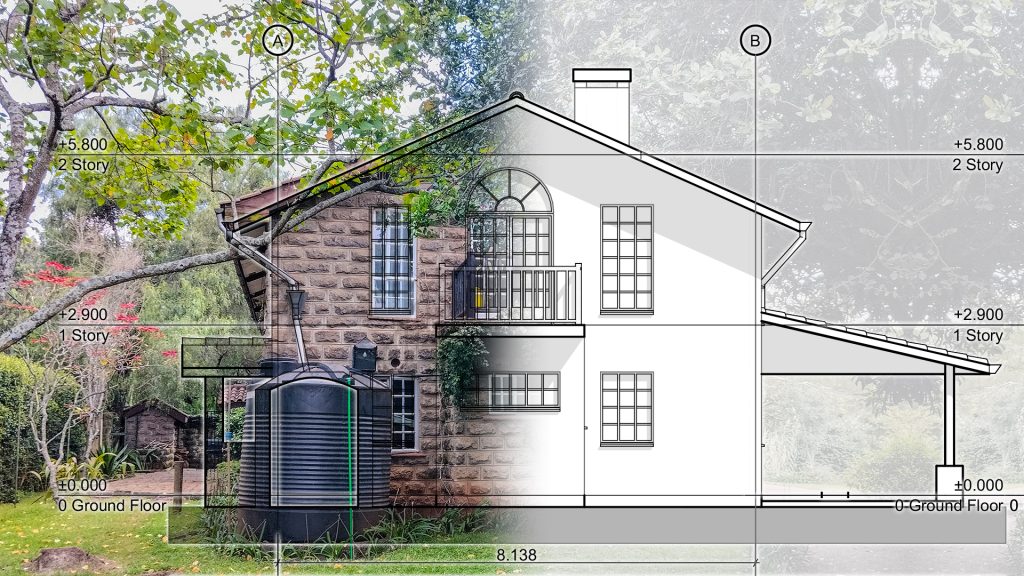
That’s where Scan-to-BIM changes the game. Instead of relying on estimates and piecemeal notes, you capture the entire building—inside and out—as a detailed 3D dataset. From there, you can build a BIM model that’s accurate down to the centimeter. And once you’ve got that, everything else, plans, sections, elevations, all flows naturally.
The Karen Project: A Real-World Case
On this project, we used three different survey tools, each chosen for the role it plays in capturing a complete dataset.
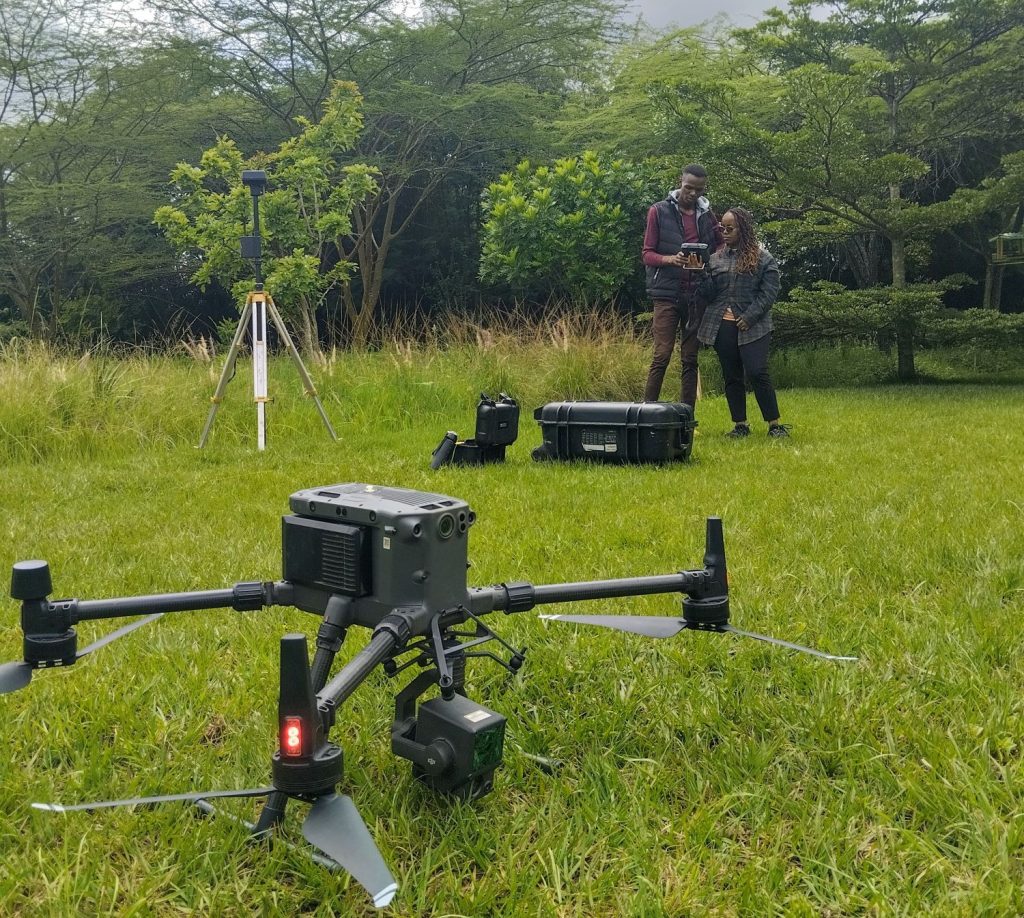
- DJI Matrice 300 RTK + Zenmuse L1 for aerial LiDAR
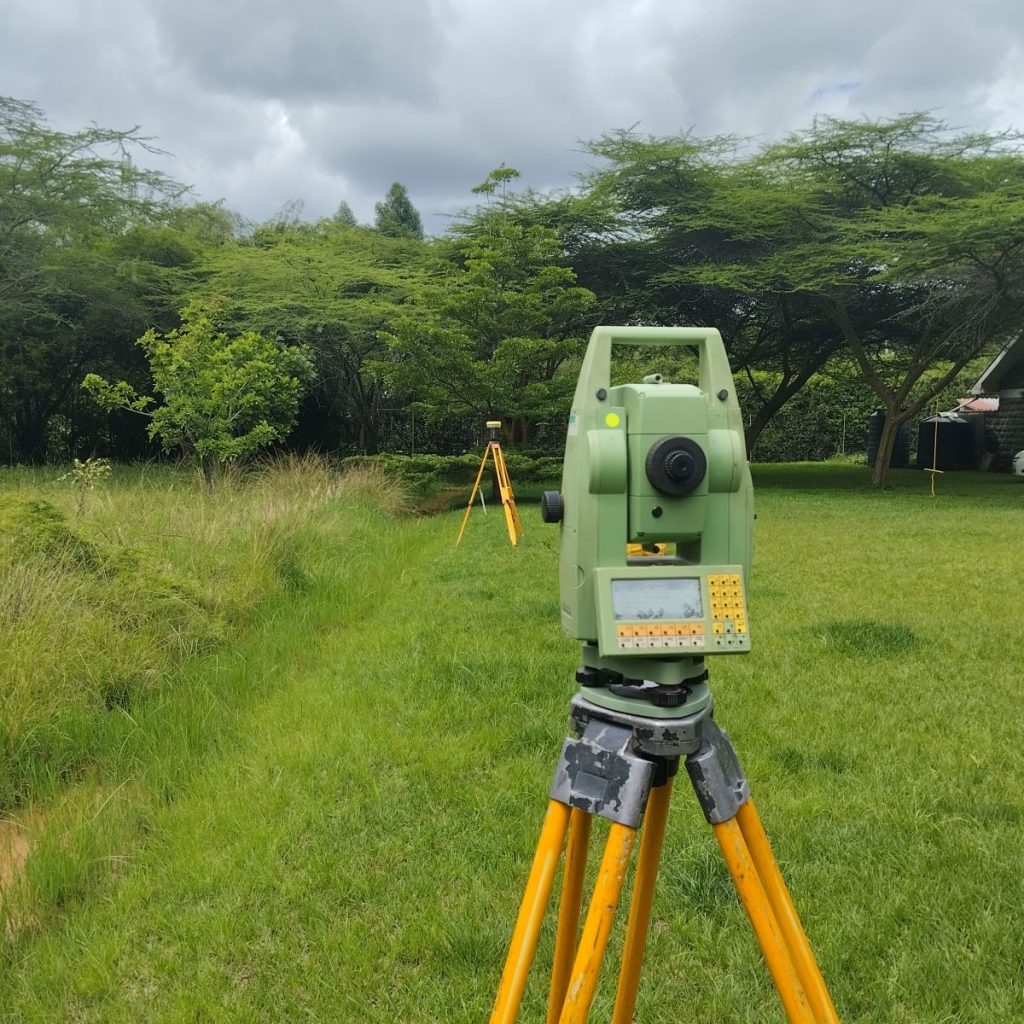
- Leica Total Station for ground/tree stem accuracy under canopy
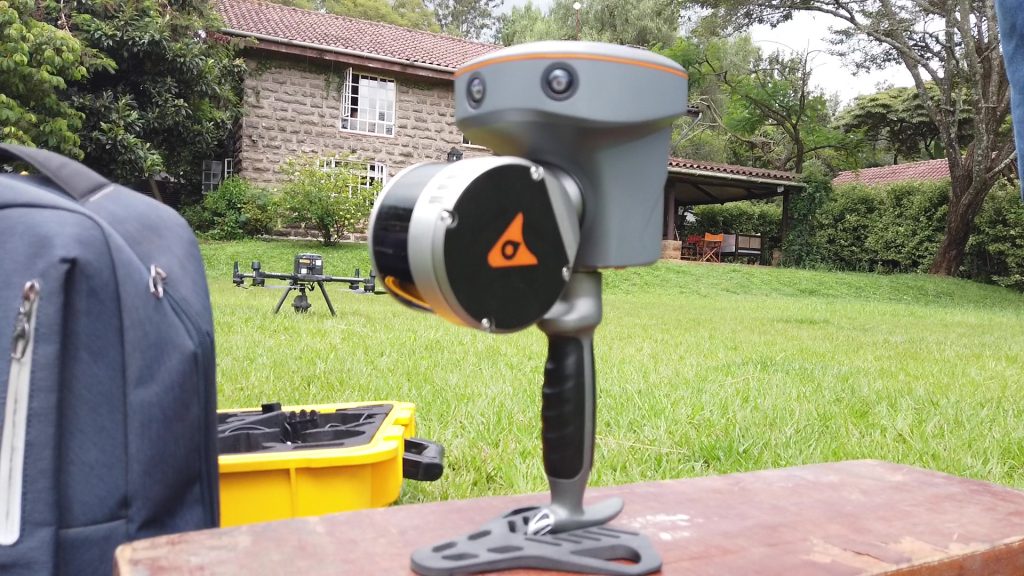
- CHCNAV RS10 handheld LiDAR for fast, high-res interior scans
That’s something worth stressing: no single technology can do it all. A drone is brilliant for exteriors, but it struggles under heavy trees. A handheld scanner makes quick work of interiors, but it can’t give you roof geometry. A total station is slow, but sometimes it’s the only way to capture what nothing else can see.
The trick is combining them into a workflow where each tool fills the gaps of the others.
Step 1: Starting from the Air
The survey began in the sky with the DJI Matrice 300 RTK, equipped with the Zenmuse L1 LiDAR sensor. If you’re not familiar, think of the L1 as a way of “painting” the world with laser light. Each pulse bounces back from surfaces, whether that’s a roof, a tree canopy, or the ground, and the sensor stitches those returns into a dense 3D cloud of points.
Flying over the compound, we were able to capture the overall layout: roof shapes, canopy structures, visible ground surfaces, and the relative position of the buildings. From above, you get an honest picture of geometry that’s almost impossible to sketch accurately from the ground.
But the drone also has limits. The property was densely vegetated. Underneath the trees, the ground was hidden from the drone’s view. Roofs that tucked beneath branches, or low areas shaded by overhangs, were missing data. That’s not a fault of the drone, it’s simply physics. LiDAR works line-of-sight, and if the sensor can’t “see” the surface, it can’t measure it.
Step 2: Filling in the Gaps on the Ground
To complete the dataset, we set up a Leica total station on the ground. Unlike the drone, the total station works from fixed points, shooting laser distances to specific targets. It’s not fast, but it’s incredibly precise.
We used it primarily to capture tree stems, ground points beneath the canopy, and other obscured areas. These were the blind spots of the drone survey, and without the total station, they would have remained gaps in the model. In Scan-to-BIM, accuracy isn’t just about what you can see, it’s about making sure nothing is missing ensuring all areas under tree canopies are captured.
Step 3: Capturing the Interiors
Once the exterior was mapped, we moved inside with the CHC Nav RS10 handheld LiDAR scanner. This tool is almost deceptively simple: you walk through the building while the scanner collects data in real-time. Behind the scenes, a SLAM (Simultaneous Localization and Mapping) algorithm is constantly aligning the scan, ensuring that when you loop back to where you started, the geometry matches.
For this project, we scanned both buildings, two storeys and a staircase, in under 30 minutes. Compare that to traditional manual measurement, which could easily stretch into a day or more. And the detail was far beyond what a tape measure could capture. The scanner picked up wall thicknesses, ceiling heights, stair dimensions, and even small irregularities in roof pitches.
Walking through the point cloud later, you could see the buildings in a level of detail that felt almost photographic, except every pixel was a measured point in 3D space.
Step 4: Merging It All
The real magic happens when you bring the datasets together. The drone LiDAR, the total station points, and the handheld scans were all aligned into a single unified point cloud. Now the property could be viewed as one seamless model, inside and out.
The landscaping detail was especially striking. Tree stems, branches, and low vegetation appeared alongside the cottage and servant’s quarters, giving context you’d never get from drawings alone. Cross-sections through the point cloud revealed floor levels, ceiling voids, and roof geometry in sharp clarity.
It’s one thing to describe it, another to see it: imagine peeling away layers of a building to look inside, but knowing every line you’re seeing is dimensionally true.
From scan to BIM
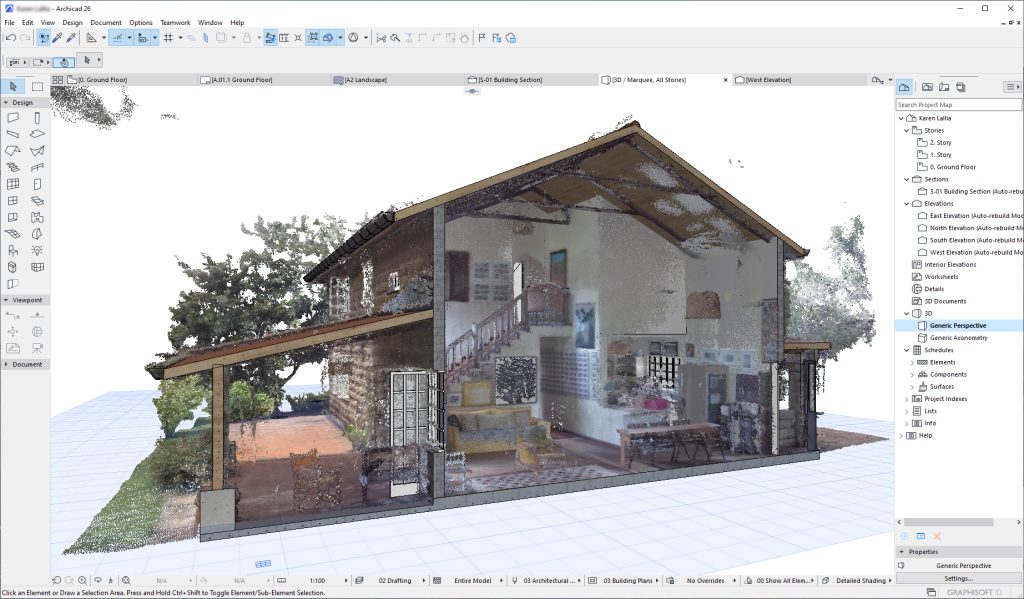
With the point cloud in hand, we moved into ArchiCAD to begin the reconstruction. This is where patience comes in. The software doesn’t magically spit out a BIM model from the scan, you still have to build it, carefully tracing over the point cloud.
That said, newer tools are helping. Some AI-assisted features can recognize walls or slabs and auto-generate elements. But in practice, a lot of manual work remains. You’re not just modeling geometry, you’re interpreting what the scan shows, making sure every door, window, and wall aligns as it should.
The beauty is that the point cloud acts as an always-accurate reference. You’re not relying on rough site sketches or photos. Every time you place a wall in ArchiCAD, you know it’s exactly where it should be, down to the centimeter.
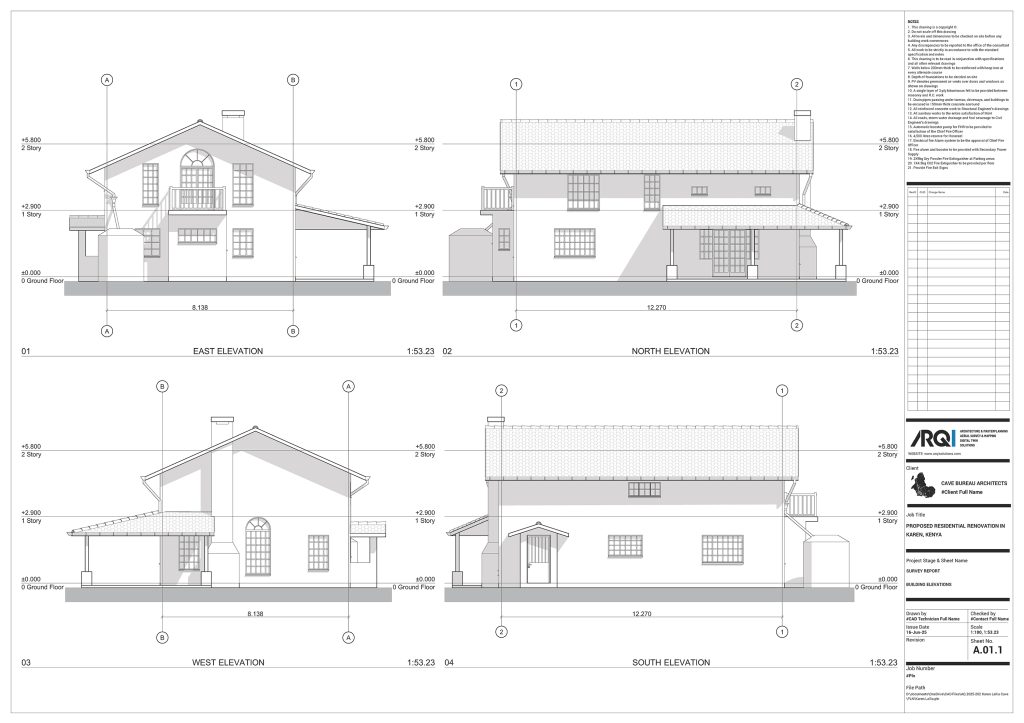
From the BIM model, we extracted full sets of drawings: floor plans, sections, elevations. But the BIM model is more than just a source of drawings, it’s a living digital twin of the buildings. Architects and Engineers can use it for design work, energy analysis, or coordination with future consultants.
The result
By the end of the process, the client had:
- A unified point cloud of the entire site
- Accurate as-built CAD drawings (plans, sections, elevations)
- A BIM model in ArchiCAD, ready for future design work
The biggest difference compared to traditional methods was speed and accuracy. What would have taken days of measuring was done in a few hours of scanning. And instead of relying on approximations, the architects now have a dataset they can trust
For example, the handheld scans captured ceiling voids and roof details that would have been almost impossible to measure manually. Even double-height spaces and awkward roof pitches came through clearly in the model. Nothing was left to guesswork.
What struck me most on this project is how scalable Scan-to-BIM has become. It’s not just for mega-developments or infrastructure. Here we were, documenting a single residential compound, and the same technology applied beautifully.
It also reinforced a point we often make to clients: accuracy pays for itself. If you start a renovation with unreliable drawings, mistakes multiply down the line. Walls don’t line up, materials get wasted, timelines slip. But when you begin with a centimeter-accurate BIM model, you’re working from solid ground.
Looking Ahead
Scan-to-BIM will only get faster and smarter. AI is already helping automate parts of the modeling process, and in a few years, we may see scans converting directly into BIM elements with minimal intervention. But even today, the value is clear. For anyone working with existing buildings—whether that’s architects, engineers, or contractors—the ability to capture a site quickly and accurately changes the way you work.
For us, the Karen project was a reminder that technology isn’t just about efficiency. It’s about clarity. It gives everyone, from client to architect, a single source of truth to build from. And that’s something no tape measure can match.
Watch the whole process from scanning to modelling in the video below:
Used procedures and technologies
BIM
CHCNav
DJI
Drone Survey
Drones
Laser Scanning
LiDAR
RS10 Handheld Scanner
Scan to BIM
Scan-to-BIM